Start Here: Basic Configuration
To get started using the Opero Fax app, follow the steps below.
- Install
- Authorize & Configure Settings
- Set User Permissions
- Relate the Sent Fax and Received Fax Objects to Other Objects
- Modify Page Layouts
Install
- Go to the AppExchange profile for Opero Fax and click the Get It Now button and follow installation steps.
- Once you have the app installed, go to the app launcher and open the Opero Fax app.
- Open the tab “Opero Fax Configuration”.
- Click the “Grant Access” button.
- This grants site wide access, so it only needs to be performed once. Carefully review the next section Set User Permissions for specific access and permissions users need in order to use the app.
- You will be prompted to allow Opero Fax to access your Salesforce org so that the Opero Fax server can update the status of your Sent Fax and Received Fax records.
- Once you grant access, a test fax number will be automatically assigned to you and will be displayed next to “Available Fax Numbers”. You can use this test fax number for a trial with 20 free pages that you can fax incoming/outgoing for up to 15 days.
- Enter an alert email. this is where you email alerts from Opero Fax are sent if there is an issue updating the Sent Fax or Received Fax records in your Salesforce org.
- When you are ready to activate your Opero Fax account, see this article: Activate Your Opero Fax Account . As part of the activation process, you’ll be able to select whether to keep the test fax number, request a new fax number, or port over your existing fax number. For information about porting over an existing fax number, see this article: Porting Fax Lines.
Authorize & Configure Settings
From the Fax Configuration page, you can edit cover page settings, configure eFax Developer settings, and set up auto-faxing.
Cover Sheet
This section includes settings for the cover sheet feature. See this article for more information: Configure a Custom Cover Sheet.
- Disable Cover Sheet Feature: Select this checkbox if you do not want to include a cover sheet with your faxes. This hides the cover sheet logo settings (see below) and hides the cover sheet option from the Send Fax page.
- Coversheet Logo Image URL: Provide an external URL for the logo. To get an external URL:
- Switch to Salesforce Classic.
- Open Documents.
- Click “New”.
- Add image.
- Click “Save”
- Right click the image.
- Select “Copy Image Address”.
- Paste this URL into the “Coversheet Logo Image URL” field.
- Coversheet Logo Width: Set the width of the logo in pixels.
- Coversheet Logo Height: Set the height of the logo in pixels.
- Coversheet Logo Position: Select the position of the logo (Center, Left, Right).
eFax Developer Settings
- Default Fax Number: This is the default fax number for the organization.
- Alert Email: This is the email address that will receive any alerts.
- Disable Barcode Feature: Select this checkbox to disable the barcode feature.
- Set Barcode Pages: This feature provides the option to specify which pages should have a barcode. When using a cover sheet with the set barcode pages feature, page 1 will be the cover sheet. Note: When the “Set Barcode Pages” checkbox is selected, the “Disable Barcode” checkbox should not be selected.
- Use Files: Select this checkbox if you would like to receive faxes as files. If desired, add the “Files” related list to page layout ( a copy of the received fax appears in both “Notes & Attachments” and “Files” related lists, so it is not required).
- Self Busy Feature: By default, the system prevents multiple fax channels from simultaneously dialing the same fax number. We have added support for disabling this feature. Disabling this feature will allow a single fax number to be dialed simultaneously by multiple fax channels.
- Authorized By: Displays the user who authorized the Opero Fax app.
Auto Fax Rules
This section allows you to set up fax automation based on attachments. For specific configuration steps, see this article: Automate Faxing Based on Attachments.
Set User Permissions
Permission Sets
Opero Fax comes with two permission sets that allow Admins to grant the permissions needed to authorize and use the app. Due to the fact that managed permission sets cannot include system permissions, Admins must manually add the system permissions listed for each permission set.
Fax User Permission Set
Allows users to create/update Sent Fax and Received Fax records, as well as access the Send Fax page to send faxes. This permission set could be assigned to users who need to use the Opero Fax app. These System Permissions must be manually added to the Fax User permission set:
- API Enabled
- Send Outbound Messages
Fax Admin Permission Set
Includes all permissions needed to be able to grant access and configure settings on the Fax Config page, plus all permissions in the “Fax User” permission set. If desired, the Fax Admin permission set could be removed from the user after granting access to limit permissions of this integration user after granting access. These System Permissions must be manually added to the Fax Admin permission set:
- API Enabled
- Manage Custom Permissions
- View All Custom Settings
- Customize Application (requires View Setup and Configuration)
- View Setup and Configuration (requires View Roles and Role Hierarchy)
Manually Grant User Permissions
Alternatively, if you would prefer to manually grant the permissions, they are listed below.
Profile permissions for users who grant access:
- Visualforce Page Access:
- efaxapp.eFaxConfiguration
- efaxapp.eFaxConfigurationGeneralEdit
- Custom Setting Definitions:
- efaxapp.eFax General Settings
- efaxapp.eFax Org Numbers
- efaxapp.eFax Private Settings
- System Permissions:
- API Enabled
- Manage Custom Permissions
- View All Custom Settings
- Customize Application (requires View Setup and Configuration)
- View Setup and Configuration (requires View Roles and Role Hierarchy)
Permissions required for users who own the files they are faxing:
- System Permissions:
- Send Outbound Messages
- API Enabled
Permissions required for users who do not own the files they are faxing:
Note that you can enable these permissions for the whole profile but, if you have strict files permissions set in your org, it may be better to assign it to specific users accessing the files for faxes.
- Object/Field Access:
- Sent Fax, Received Fax, any other related objects/fields being used in the faxing process. You can review all app package components that users may need access to by going to Setup > Installed Packages > click on Opero Fax app > click “View Components.”
- System Permissions:
- Send Outbound Messages
- API Enabled
- App Permissions:
- Manage Content Permissions (might need to enable depending on your org settings)
- If using Files, check that Files sharing permissions are not set to private and enable the App Permission, “Query All Files”.
- If using Documents, enable “Modify All” for the Documents object.
Permissions required for community license users sending faxes:
Note that permission for community license users to upload Documents is no longer supported by Salesforce.
- System Permissions:
- API Enabled
- Allow site guest users to upload files (Setup>Salesforce Files>General Settings)
Relate the Sent Fax and Received Fax Objects to Other Objects
By default both the Sent Fax and Received Fax objects are related to the following standard objects: Account, Case, Contact, and Opportunity. These are the only relationships that come out of the box. You can relate the Sent Fax and Received Fax objects to any other object. To do this, create a lookup field on both the Sent Fax and Received Fax objects that relates to the other object.
- Go to Setup>Create>Objects>Sent Fax, then click “New” button under Custom Fields & Relationships section.
- Data Type – choose “Lookup”.
- Related To – Select the object you are relating to the Sent Fax /Received Fax object.
- A default field label will be created from the name of the object. You can modify it if you want. Click Next.
- Set field level security for which profiles will see the field, click Next.
- Add the field to the layout on the Sent Fax /Received Fax layout. Click Next.
- Add the related list on the related object – this allows you to see the Sent Faxes related list. Click Save.
Modify Page Layouts
Add Sent and Received Fax Related Lists to Page Layout
After you have related the Sent Fax and Received Fax objects to another object, you can now edit the related object’s page layout. For example, to add the Sent and Received Fax related lists to the Contact object page layout:
- Go to the page layout editor and click Related Lists.
- Drag Sent Faxes and Received Faxes down to the related list area if it is not already showing on page layout.
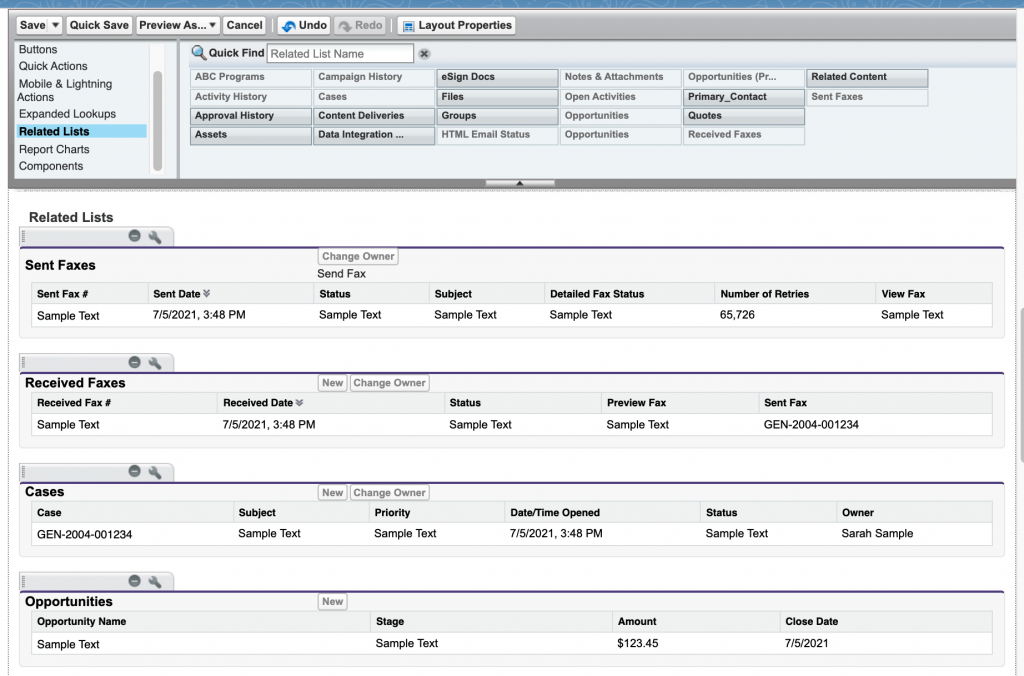
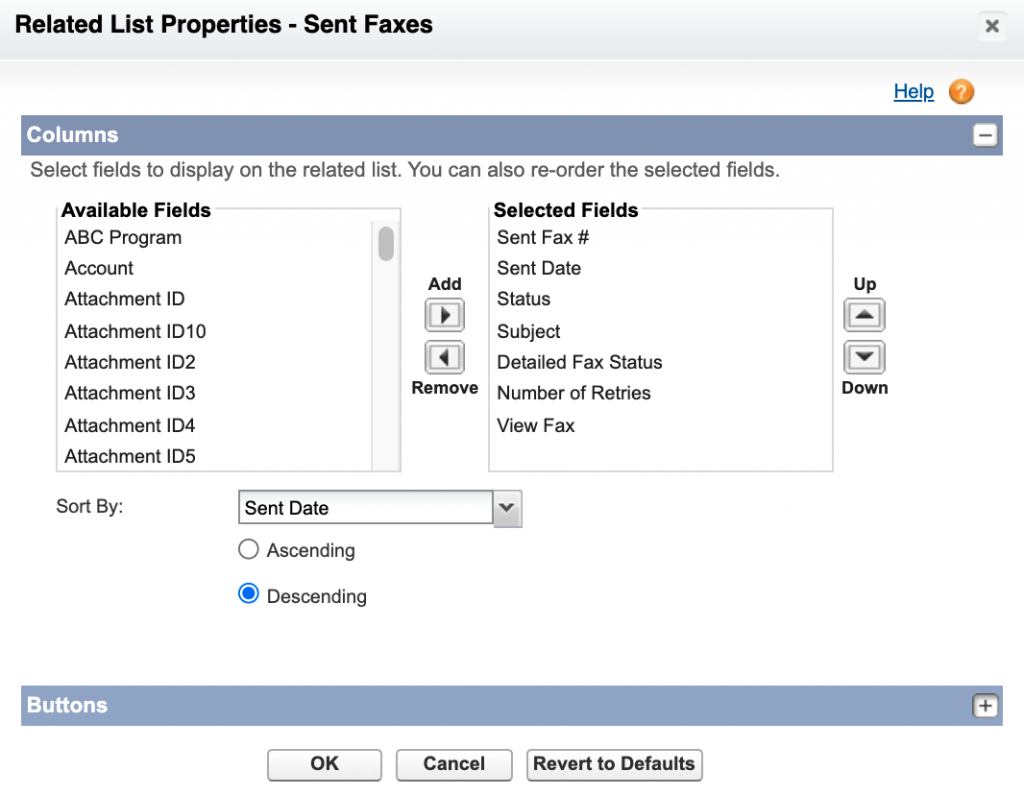
- Then, select which columns to display in the related list. Click on the wrench icon on the Sent Fax related list. Add any available fields shown in the related list that you would like to show on the related list layout. We recommend adding: Sent Fax #, Send Date, Status, Subject, Detailed Fax Status, and Number of Retires.
- Sort Descending by “Sent Date” field.
Add “Send Fax” Button to Related Lists
- After you add the Sent and Received Fax Related Lists to the page layout, you may add the “Send Fax” button to the Sent Faxes related list. This button allows you to send a fax that is automatically related to the record.
- Click the Buttons area at the bottom just above the “Ok”, “Cancel” and “Revert to Defaults” buttons.
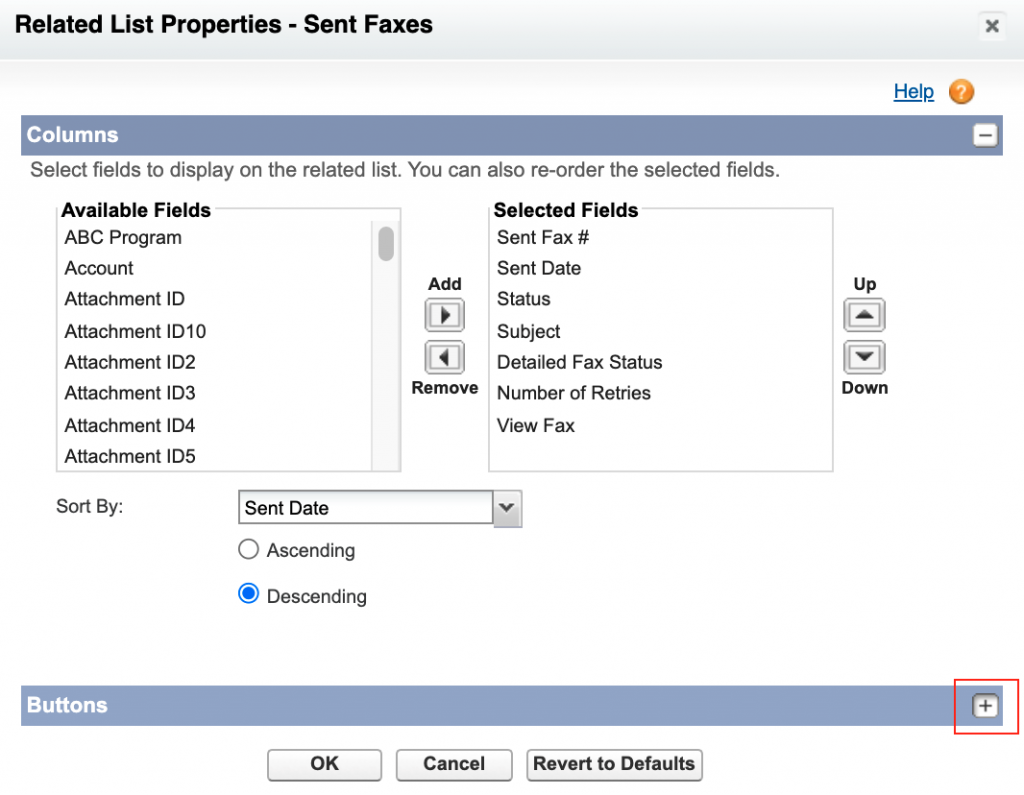
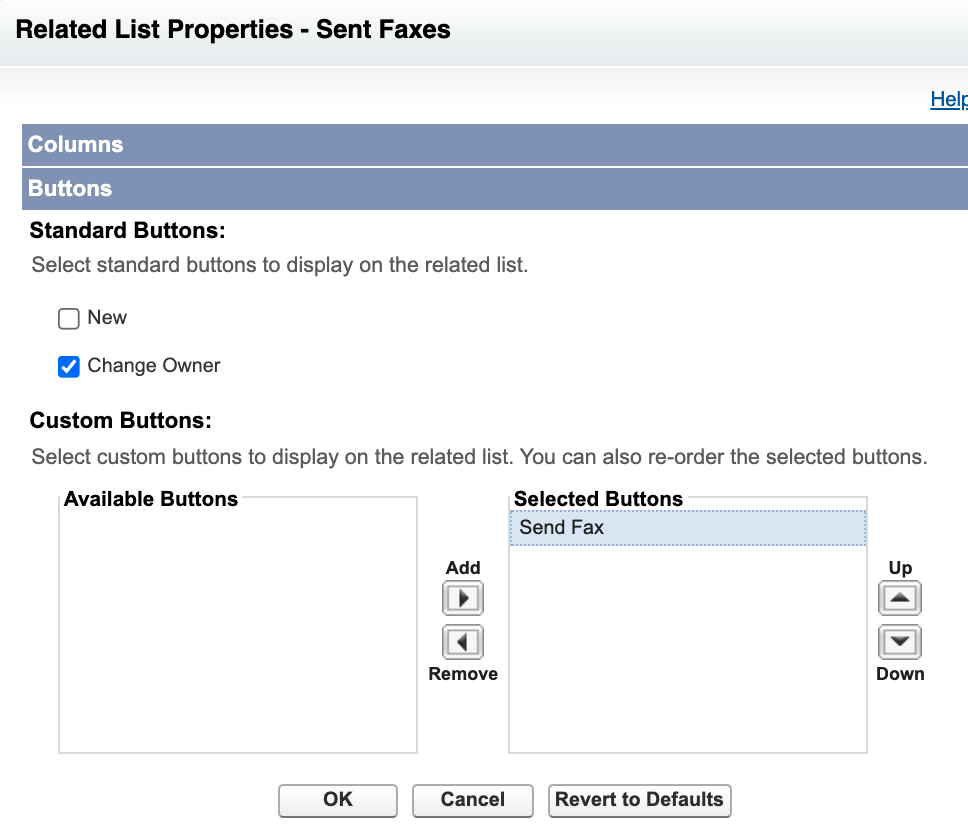
- This will expand the Buttons section. Move the Available Button “Send Fax” over to Selected Buttons section.
- Then also uncheck the Standard Button “New” to remove that from the layout so there is only one button visible. If you will need to create manual sent fax records (not common use case), then you will need to keep this “New” button checked so you may add a new fax record manually.
Add Fax Number Fields
To create a custom “Fax” field on any object to make it available to the app, just create a custom field with the type “Phone”. That field will be available in the field configurations for setting up any auto faxing or when sending a fax manually related to that object to select a fax number. As long as you are sending the fax from an object where there is a value in the fax number field, the sent fax relationship should automatically populate when clicking “send fax” button from sent fax related list.
Modify Send a Fax Page
- Click on the Send Fax tab to view the Send Fax page. You can add the lookup fields included with the app to this page (Account, Contact, Opportunity, or Case), add your own custom lookup fields, or additional custom fields.
- For example, create custom fields to set a field value when sending a fax, such as fax category, type of fax, an urgent flag, or any fields you would want to have merged into a custom cover sheet.
- Once you have created your custom fields on the Sent Fax object, they will appear in the “Send Fax Custom Fields” Field Set on the Sent Fax object (Setup>Object Manager>Sent Fax>Field Sets). The Field Set allows you to modify the Send Fax page layout by adding fields or reordering how the fields are displayed on the layout.