Basic Configuration
This article outlines the sequence of steps to follow for basic configuration of the Opero Ship app.
- Install the app from AppExchange
- Set User Permissions
- Configure Shipment Settings
- Configure Fulfillment Locations
- Configure a Create Shipment Button
- Relate the Shipment Object to Other Objects
Install the App
Install the app from AppExchange. You will be prompted to authorize api access to the following domains:
- ws.fedex.com
- wsbeta.fedex.com
- production.shippingapis.com
- secure.shippingapis.com
- stg-secure.shippingapis.com
- onlinetools.ups.com
- wwwcie.ups.com
- xmlpi-ea.dhl.com
- xmlpitest-ea.dhl.com
- accounts.google.com
- www.googleapis.com
This is to communicate with UPS, USPS, Endicia (USPS), Stamps (USPS), Fedex, and DHL Express for shipment label creation, rate checking, and status checking. Google is for Google Drive, in case you want to save your shipping label images to your Google Drive. You will still need to configure your own account information for each carrier and authorize each connection.
When installing the app package into Salesforce, you will see this example screen to approve Third-Party Access (you will see more options than this): 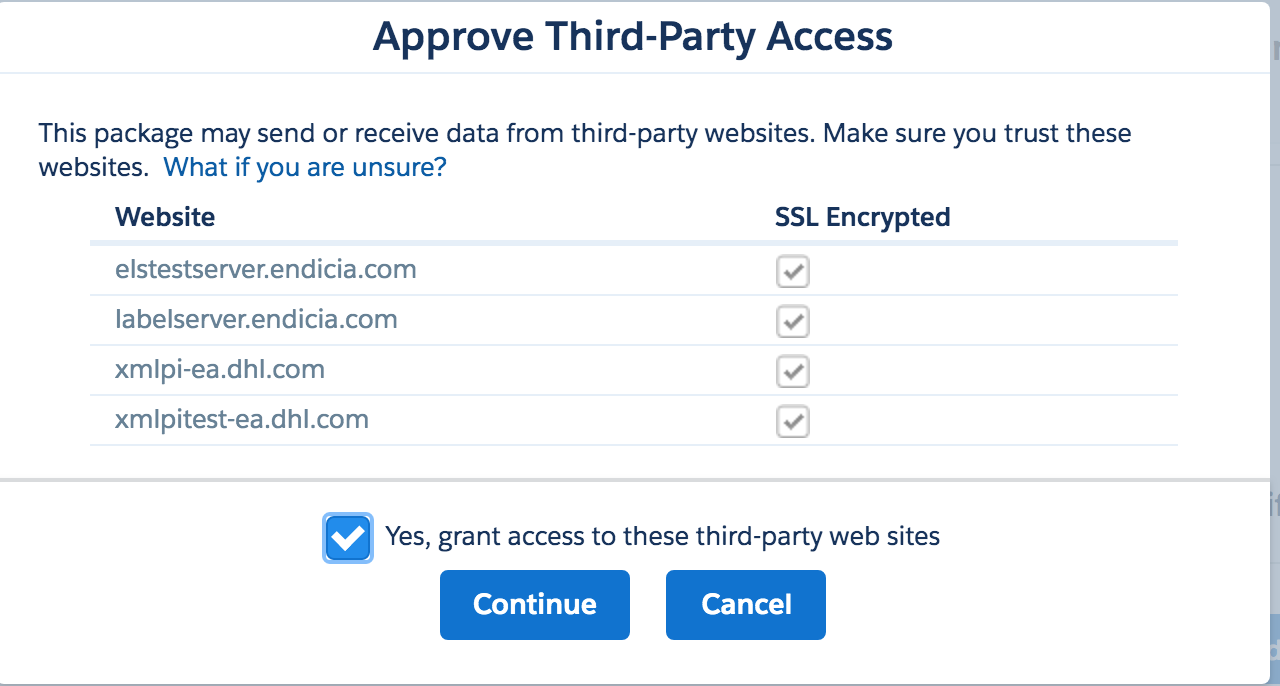
Set User Permissions
Opero Ship comes with two permission sets: “Opero Ship User” and “Opero Ship Administrator”.
Opero Ship User
Allows non-admin users to create shipping labels. This permission set could be assigned to users who need to use the Opero Ship app. The following permission should be granted manually:
- “View All” permission on Carrier Account object.
Opero Ship Administrator
Includes all permissions needed to be able to grant access and configure settings on the Ship Config page, plus all permissions in the “Opero Ship User” permission set. Due to the fact that managed permission sets cannot include system permissions, these System Permissions must be granted manually:
- Customize Application
- View Setup and Configuration
- Manage Custom Permissions
- View Roles and Role Hierarchy
Configure Shipment Settings
Go to the Ship Configuration tab to configure shipment settings. There are two categories: General and Carriers. Within the General category, you can configure Shipment Tracking, Shipment Processing, and Google drive. Within the Carrier category, you can configure carriers.
Shipment Tracking
To automatically track the shipment status of your Shipment records, click Enable Tracking button on the Shipment Tracking tab.
Shipment Processing /Automation
If you would like the app to automatically create shipping labels for Shipment records, click Enable Processing on the Shipment Processing tab. This processing will run every hour. For more information, see article Auto Create Shipping Labels.
Save Labels to Google Drive
If you would like to automatically create and save shipping labels to your personal or company Google Drive instead of an attachment in Salesforce, then go to the Google Drive tab and click “Enable Google Drive” to authorize your Google account. For more information, see article Auto Create Shipping Labels with Google Drive.
Configure Carriers
See the following articles for steps to configure each shipping carrier.
- Configure UPS
- Configure USPS
- Configure Stamps.com (USPS)
- Configure Endicia (USPS)
- Configure FedEx
- Configure DHL Express
Configure Fulfillment Locations
Using the Fulfillment Locations feature allows you to automatically populate the location information for locations you typically ship from whenever you create a new Shipment record.
- Open the Opero Ship App.
- Click the Fulfillment Location tab.
- Create a new record and fill out the shipping location information.
- For the Fulfillment State field, enter the state code, e.g., “TX”.
- For the Fulfillment Country field, enter the country code, e.g., “US”.
- Click “Save”.
You will now see this fulfillment location in the Fulfillment Location picklist of available options to select and automatically populate the Ship From address information.
Configure a Create Shipment Button
Configure a custom button that creates a New Shipment record with merged data from a specific record and relates it to that record.
Create the Button
- Go to Setup>Object Manager.
- Select the object for your button.
- In the object’s menu on the left, select “Buttons, Links, and Actions”.
- Select “New Button or Link” on upper right.
- Enter the name of your button in “Label” (e.g. Create Shipment).
- Select the “Detail Page Button” Display Type.
- Configure the Button Code – At the bottom of the page is a box where you will add your button code. The button starts the process of creating a new shipment by linking to the New Shipment page and sends values to specific fields. How you choose to configure your button is determined by your organization’s needs, Salesforce org, and business processes. The button will be a url type and will link to “/apex/rs_ship__PrintPostageLabel” which is a visual force page included with the app package. Then you can add url variables to pre-populate the fields on that page. To add variables in the url you add “?” after the initial url and then “&” in between each additional variable.
Add Button to Page Layout
- In the object’s menu on the left, select “Page Layout”.
- Select the page where you plan to add your button.
- In the object’s layout editor, select “Buttons” from the menu on the left side of the editor.
- Locate your new button, then drag it down to the “Customs Buttons” section of the object’s Detail page layout.
- Click “Save”.
Overview of Button Variables
Listed below is an overview of the variables that you could put in your button code. All variables are optional and order does not matter.
| FIELD NAME | DESCRIPTION |
| relatedToField | The relatedToField parameter is used to relate a specific record to the shipment that is going to be created. Expects the API name of the custom lookup field on the Shipment object which will be used to save the Id provided in relatedTo. |
| relatedTo | The relatedTo parameter is used to related a specific record to the shipment that is going to be created. Provide either a hardcoded Id (e.g. 003XXXXXXXXXXXXXXX) or the merge code for a field that contains a record Id (e.g. {!Account.Id}). This value will populate the relatedToField specified. |
| fedex_acct | Once you configure Carrier Accounts, this parameter specifies which FedEx Carrier Account to use. Provide the Salesforce Id of the Carrier Account record. |
| dhlexpress_acct | Once you configure Carrier Accounts, this parameter specifies which DHL Carrier Account to use. Provide the Salesforce Id of the Carrier Account record. |
| ups_acct | Once you configure Carrier Accounts, this parameter specifies which UPS Carrier Account to use. Provide the Salesforce Id of the Carrier Account record. |
| fullfilmentLocationId | Once you configure Fulfillment Locations, you can enter the Fulfillment Location in the button code so you don’t have to populate or send parameters for each of the “From” fields. Provide the Salesforce Id of the Fulfillment Location. When providing Fulfillment Location Id, the app must query for the fulfillment location and do some logic to populate the fields. If you are concerned about processing speed, you can instead provide values for each of the “From” fields that you want to populate values instead of defining the Fulfillment Location Id (below). |
| labelType | Default label type. Options vary by carrier. |
| labelSize | Default label size. This field is dependent on “labelType”. |
| imageRotation | Default image rotation. Options: “None”, “Rotate90”, “Rotate180”, “Rotate270”. |
| The “From” fields below indicate sender information; format can be either hardcoded values or merge code. Typically the merge code would be pulled from the Organization company fields. | |
| fromCompanyName | Sender’s company name. |
| fromContactName | Sender’s contact name. |
| fromPhoneNumber | Sender’s phone number. |
| fromAddress | Sender’s street address. If you have two address lines you should combine them in the formula to go into this one field. |
| fromCity | Sender’s city. |
| fromState | Sender’s State. The available formats for fromState parameters are state codes and state names (CA and California). For states consisting of two words, like North Carolina, you can pass the value as separate words or one word (North Carolina or NorthCarolina) as well as a state code (NC). Case is not important, as you can pass the value in all possible combinations, like NORTHCAROLINA, northcarolina, NORTHcarolina, etc. Same with state codes. |
| fromCountry | Sender’s country code (e.g. US). |
| fromPostalCode | Sender’s postal code. |
| The “To” fields below indicate recipient information; typically they are merge field code but they can also be hardcoded values. | |
| toCompanyName | Recipient’s company name. |
| toContactName | Recipient’s contact name. |
| toPhoneNumber | Recipient’s phone number. |
| toAddress | Recipient’s address. If you have two address lines you should combine them in the formula to go into this one field. |
| toCity | Recipient’s city. |
| toState | Recipient’s state. The available formats for fromState parameters are state codes and state names (CA and California). For states consisting of two words, like North Carolina, you can pass the value as separate words or one word (North Carolina or NorthCarolina) as well as a state code (NC). Case is not important, as you can pass the value in all possible combinations, like NORTHCAROLINA, northcarolina, NORTHcarolina, etc. Same with state codes. |
| toCountry | Recipient’s country code (e.g. US). |
| toPostalCode | Recipient’s postal code. |
| mailWeight | This is the weight of the package. A common use case would be to configure a weight field on the the object you use to track items being shipped (e.g. Product), then use roll up summary fields and/or automation so that a total weight is rolled up to a field on the object that is related to the shipment (e.g. Order). |
| retURL | The retURL parameter is used to take you back to the record in case you click Cancel. Formatting will match what was used for relatedTo parameter (either hardcoded Id or merge code). It will merge the Salesforce Id of the record where you will return. |
Button Code
Listed below is button code with variables listed without any values. Copy and paste the blank code to start with, then fill in values after the = sign on each variable that you wish to populate.
Blank Button
/apex/rs_ship__PrintPostageLabel?relatedTo=
&relatedToField=
&fedex_acct=
&dhlexpress_acct=
&ups_acct=
&mailWeight=
&fromCompanyName=
&fromPhoneNumber=
&fromAddress=
&fromCity=
&fromState=
&fromCountry=
&fromPostalCode=
&toCompanyName=
&toContactName=
&toPhoneNumber=
&toAddress=
&toCity=
&toState=
&toCountry=
&toPostalCode=
&retURL=
Example Button
You can relate a New Shipment to a record on any standard or custom object. This example button relates a New Shipment record to an Account record.
/apex/rs_ship__PrintPostageLabel?relatedTo={!Account.Id}
&relatedToField=Account__c
&mailWeight=1
&fullfilmentLocationId=a00F000000KZQAY
&fromCompanyName=USA Factory Co
&fromPhoneNumber=555-555-6758
&fromAddress=111 Broadway St.
&fromCity=New York
&fromState=NY
&fromCountry=USA
&fromPostalCode=10001
&toCompanyName={!Account.Name}
&toContactName={!Account.Primary_Contact_Name__c}
&toPhoneNumber={!Account.Phone}
&toAddress={!Account.ShippingStreet}
&toCity={!Account.ShippingCity}
&toState={!Account.ShippingState}
&toCountry={!Account.ShippingCountry}
&toPostalCode={!Account.ShippingPostalCode}
&retURL={!Account.Id}
Relate the Shipment Object to Other Objects
- Create a Lookup type field on the Shipment object.
- Add the Shipments related list to page layout.
- Configure a Create Shipment Button to pass the Related To value and lookup field name when creating a new shipment.
- You may also want to add New Shipment and Shipment tabs (from the Opero Ship app) to other apps that you use regularly.