Create a New Shipment
- Access the Opero Ship App
- From & To Location Details Section
- Package Details Section
- Carrier Specific Sections
- Review Available Rates
- Create Shipping Label
Access the Opero Ship App
- Open the app from the App menu or click More Tabs and click on New Shipment tab.
- You may also setup a custom button from another object to go to this page and pass values pre-populated.
From & To Location Details Section
- The From & To contact and address fields are required in order to create a shipment.
- You may select a Fulfillment Location if you have configured one to pre-populate the From part of the From & To Location Details section.
- Otherwise, type the information into the fields in the From & To Location Details section.
Package Details Section
- This section contains fields that are common to all active carriers, including the following:
- Total Weight – Required field. Enter the weight of the package into this field.
- Weight Unit – Required field. Enter the unit of measure for the package weight.
- This field comes by default with the values “LB” and “KG”. If you would like to be able to add Total Weight in OZ, you may customize the picklist by adding this additional value.
- If your UPS account is for a business in the US, UPS requires you to use LBS, not KGS, for the weight units. Similarly, for accounts other countries, the weight units you choose must match the weight units of that country.
- Reference – Optional field. This is a text box for any text you want to be printed on the shipping label.
- Some fields are common for two carriers. In that case, if one of the the two carriers is inactive, a common field will be displayed in the active carrier’s section. If both carriers are active, the field will be displayed in the Package Detail section.
Carrier Specific Sections
Each carrier that you have selected as “Active” under shipment configuration tab will have a carrier specific section displayed below the Package details section. The fields in each carrier’s section contain fields unique to that specific carrier.
UPS
- Carrier Account – If you have configured multiple carrier accounts, they will be available to select.
- Delivery Confirmation – Specify whether your package requires a signature upon delivery and, if yes, which type.
- Signature Required – if selected, shipment is created using the DIRECT option in the UPS API request.
- Adult Signature Required – uses ADULT option in the UPS API request.
- Delivery Confirmation – “(UPS)” is added if FedEx options are also available.
- None – Default value. If FedEx specific options are selected, this will be selected.
- Return Shipment & RMA Association – Optional fields. When creating a return shipment, select the Return Shipment field and enter the RMA number in the RMA Association field. An RMA number will be added to the shipping label.
International Shipping with the UPS Carrier
In order to support international shipping we have added several fields. These fields dynamically appear in the carrier specific section for UPS when you select an international country.
- Customs Currency – The currency of customs value. Currently supported currencies are USD, EUR, CAD, GBP, CHF, AUD, JPY with default USD. If you want to add a new currency or change the default, you can do it by customizing the RS_Ship__Shipment__c.RS_Ship__Customs_Currency__c field.
- Customs Value – The total value of all items in the shipment. Determines how much import duty the package recipient must pay. Customs value must be numeral value without decimals.
- Delivery Confirmation – for international shipping this field must be None because international shipping doesn’t support delivery confirmation.
- Product Description – Required field for creating UPS international postage label. The purpose of it is to give a basic description of the object you are shipping. For example “clothes” or “metal”, etc.
- To Country – Picklists added for Canada and Mexico States – When you select “Canada” or “Mexico” as the destination country, you will then be able to see the picklist of available states to choose from.
Additional notes:
- From Contact – this field is not required for domestic shipping, but it’s required for international shipping.
- If the destination country is in the United States, then Customs Value, Customs Currency and Product Description fields will be hidden because they are used only for international shipping.
- The unit of measurement is defaulted to the shipper’s country or territory. For US – based accounts, UPS only supports LB weight unit (does not support OZ or KG).
Stamps.com (USPS)
- Certified Mail – Check this box if your shipment is certified mail.
- Electronic Return Receipt – Check this box if you’d like an electronic return receipt.
- Package Type – Choose from the list of package types available through this carrier.
- Note: In order to use “PostCard” as the “PackageType”, customers must first contact Stamps.com support in order to get approval.
- Print Layout – Select which layout you’d like for your shipping label.
- Return Receipt – Check this box if you’d like a return receipt.
- Ship Date – This field will be visible only inside the Stamps.com section and it will be used in the situation when the user wants to get rates and print a label for some date in the future. The carrier will return an error if you choose a date that is beyond the limit set by the carrier.
- Show Return Address – This checkbox field is placed inside the Stamps.com section and can be false only if Print Layout is Envelope10. If Print Layout is any other than Envelope10, Show Return Address will show a default value of “true”.
Endicia (USPS)
- Certified Mail – Check this box if your shipment is certified mail.
- Electronic Return Receipt – Check this box if you’d like an electronic return receipt.
- Image Rotation – This field allows you to rotate the image of your shipping label when it prints.
- Label Size – Select the size of your shipping label.
- Label Type – Select whether you’d like the default label or a label for certified mail.
- Mailpiece Shape – Choose from the list of mailpiece shapes (aka package types) available through this carrier).
- Registered Mail – Check this box for registered mail.
- Show Return Address – Check this box to show the return address on the label.
FedEx
- Carrier Account – If you have configured multiple carrier accounts, they will be available to select.
- Declared Value – Add a declared value to the Package when shipping with FedEx. Affects rates.
- Delivery Confirmation – Specify whether you would like delivery confirmation for your shipment and, if yes, which type.
- No Signature Required – Uses NO_SIGNATURE_REQUIRED option in the FedEx API request. This is the default value.
- Indirect Signature Required – Uses INDIRECT option in the FedEx API request.
- Direct Signature Required – If selected, shipment is created using the DIRECT option in the FedEx API request.
- Adult Signature Required – Uses ADULT option in the FedEx API request.
- FedEx Ground – If selected, gets FedEx Ground rates. Note that FedEx Ground max weight limit is 150 LBS.
- FedEx One Rate – If selected, applies FedEx One Rate to all rates. FedEx One Rate is flat rate shipping which means that a shipment for a given destination will be the same price, regardless of the weight, as long as it is lighter than 10 LBS for FedEx Envelope and lighter than 50 LBS for all other packaging types. FedEx One Rate is only available for US domestic shipments.
- Packaging Type – Choose from the list of package types available through this carrier.
- If you select “Your Packaging”, dimensions affect rates.
- If weight unit is LB or OZ, then the dimension unit is in inches.
- If weight unit is KB, then the dimension unit is in centimeters.
- See this FedEx article that specifies the countries and territories that the 10 KG Box and 25 KG Box packaging types are available.
- Listed below are the maximal weight limits allowed for each FedEx packaging type. If you exceed the weight limit for the package type, you will see an error.
- FedEx Envelope – 8 OZ max
- FedEx 10KG Box – 22 LB max
- FedEx 25KG Box – 55 LB max
- FedEx Pak – 5.5 LB max
- FedEx Tube – 20 LB max
- Return Shipment & RMA Association – Optional fields. When creating a return shipment, select the Return Shipment field and enter the RMA number in the RMA Association field. An RMA number and an RMA barcode will be added to the shipping label.
DHL Express
- Carrier Account – If you have configured multiple carrier accounts, they will be available to select.
- Dutiable & Proforma Invoice -To get and print the proforma invoice, first you must check the Dutiable checkbox, then Attach Proforma Invoice checkbox will appear. When Attach Proforma Invoice is checked, a new section titled Proforma Invoice Details will appear.
- All of the fields available in the Proforma Invoice Details section are also available on the Shipment object, so it is possible to get the proforma invoice by creating a Shipment record manually or using some automation, and then running a Shipment Processing job. To successfully get the proforma invoice using this method, you should set the mentioned fields’ values, as well set the Is Dutiable field and Attach Proforma Invoice fields to true on the Shipment record.
- When the Shipment record is created after clicking the Create Label button on the New Shipment page, or when the record is processed by the Shipment Processing job, the proforma invoice is created along with the shipping label. You can preview the proforma invoice in the Notes & Attachments related list, or in the Proforma Invoice field on the Shipment record (if it’s not visible, add it to the Shipment page layout, or check field permissions). If an error occurred, Proforma Invoice field should be set to “Proforma Invoice Not Attached”. In that case, check the Error Message field on the Shipment record.
- Include Lithium Batteries – To specify lithium batteries on a shipping label, you must check the Include Lithium Batteries checkbox. When you do that, a new section titled Lithium Batteries will appear with options for you to select.
- Label Contents – Text to include on the label.
- Width, Depth, and Height fields refer to the dimensions of the package.
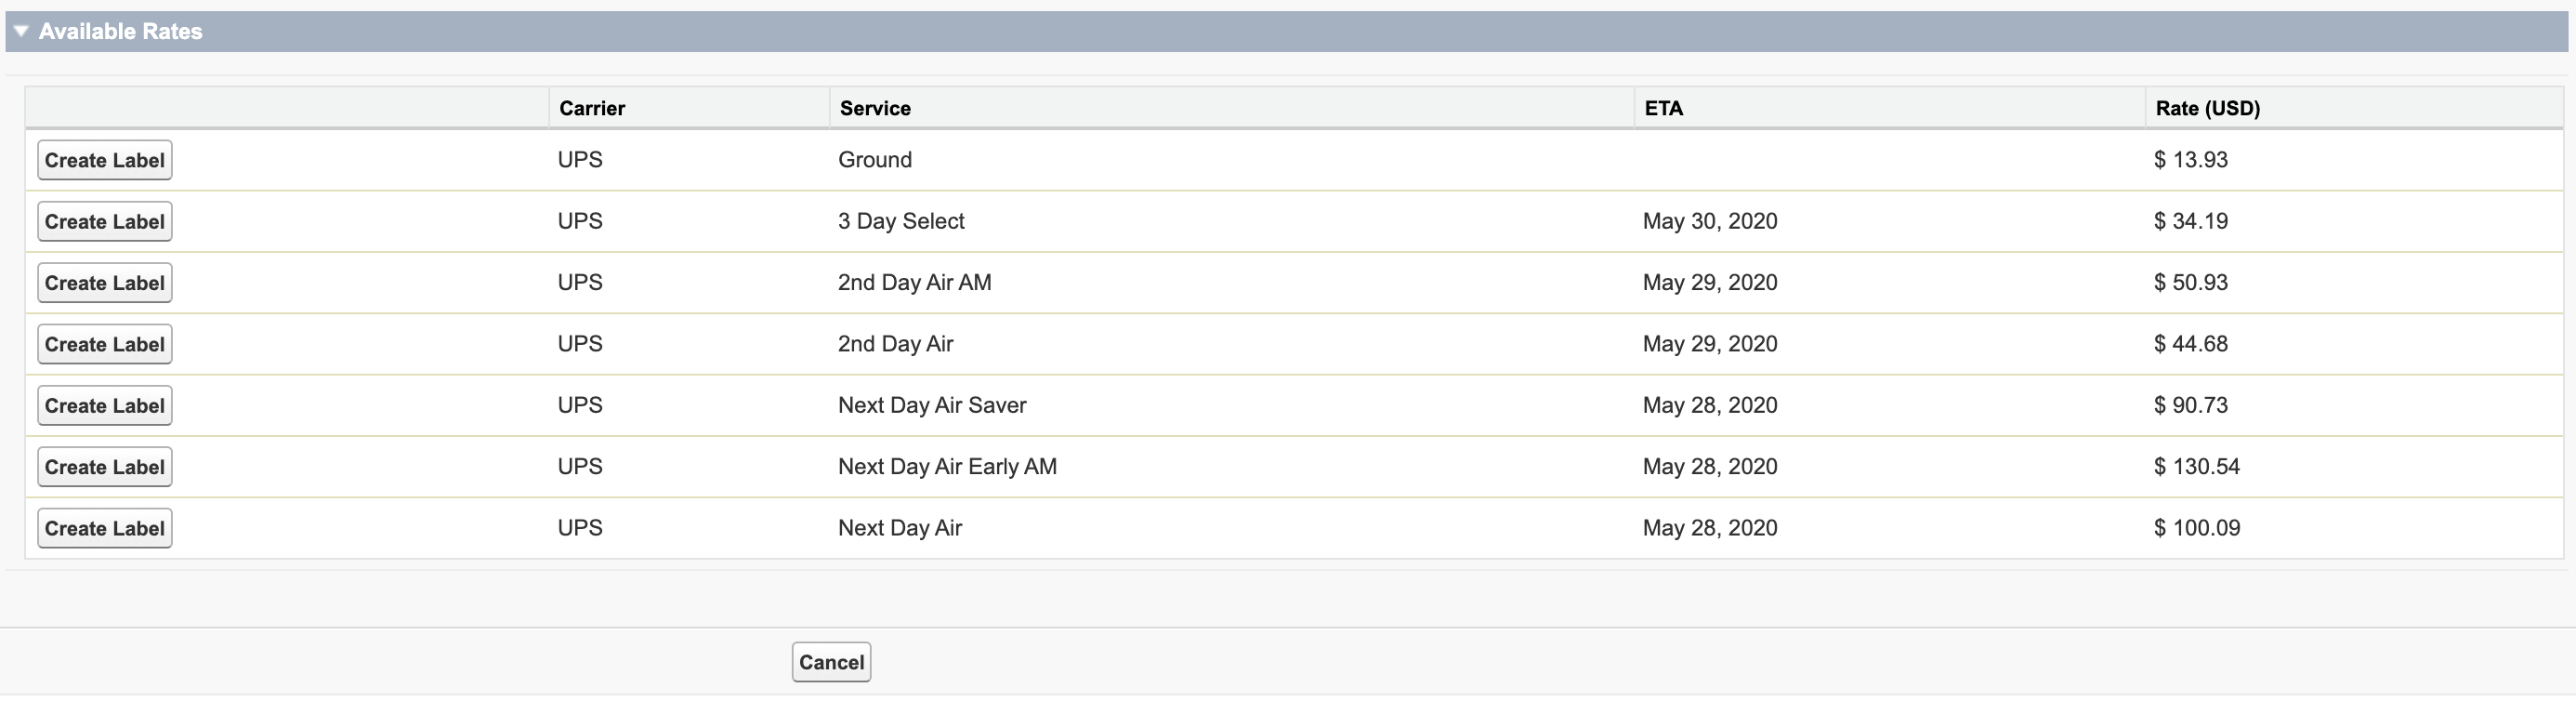
Review Available Rates
- Click the Get Rates button. When you click this button, the system will check for all rate options for the shipping providers you have setup as active in Ship Configuration.
- The available rates will be displayed in the table-like view with the following columns:
- Carrier – The shipping carrier which provides the available rate/service.
- Service – The shipping carrier’s service used to ship the package.
- ETA – Estimated date of delivery provided by the shipping carrier for the selected services. Note: This information may not be provided for some services.
- Rate (USD) – Price of shipping for the selected rate.
- Select the option that fits your needs by clicking “Create Label”.
Create Shipping Label
- The Create Shipping Label button will create a Shipment record, a shipping label, and attach the label to the record, all based on the selected rate.
- To create a return label, you would complete this same process for creating a shipment / shipping label.